
BFDD's mIRC Tutorial
6/09/2004
To chat with Descent players, visit irc.gameSurge.net #descent3 or use the suncho.com web chat. The following is a tutorial by BFDD (Derrick Morse) on how to use IRC with a client application:
IRC (Internet Relay Chat) is what PXO used for its chat interface before it died. #descent3 is Descent's new chat channel on gamesurge’s network. Gamesurge is a IRC network built by gamers for gamers. This tutorial will be here to help you set up an IRC client if you have never used one before. (tutorial will only cover mIRC)If you have IRC installed you can join the channel by clicking here or adding #descent3 in your perform list under gamesurge. If you don’t have an IRC client installed, here is a list of popular chat clients:
mIRC
HydraIRC
Xchat
Trillian
All of these chat clients are nice and easy to use, xchat and mirc are probably the easiest to use.
If you are going to use mIRC you may want to think about using a wrapper. Wrappers add allot of usability, and function to your chat client. It also spruces up the plain Jane look that mIRC has.
Invision — Only use with mIRC 6.14 and below. This wrapper is useful, but sometime buggy.
PowerPack 7.0 — Probably the most popular gaming wrapper with a lot of added support for gamers.
xTreme — A smaller wrapper that is a nice little program.
___________________________________________________________
Index
1.Setting up mIRC & Joining #Descent3
a. After install
b. Server selection
c. Connecting to #Descent3
d. Joining #Descent3 channel from channel window
e. Joining #Descent3 channel from server window
2. Automating mIRC to auto join #Descent3
a. Options
b. Perform
3 Eliminating Events in chat window
4. Friends highlighting
5 Display, Color, and Font
a. Colors
b. Fonts
c. Display[/size]
1.a. When you first install mIRC it will pop open the mIRC options tab.
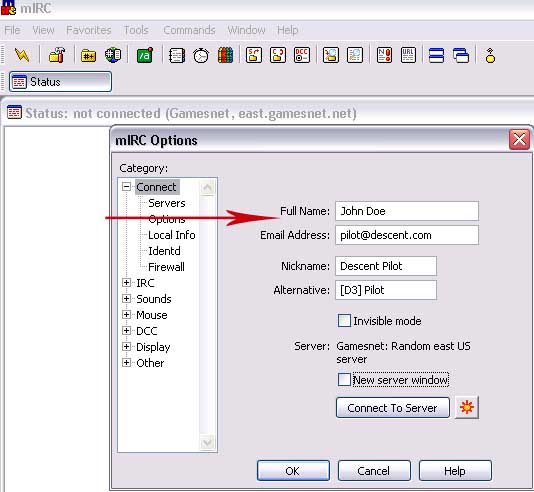
1. Fill in your name(doesn’t need to be your real name)
2. Email address
3. Pilot name(alias)
4. Alternative Pilot name
1.b Server selection
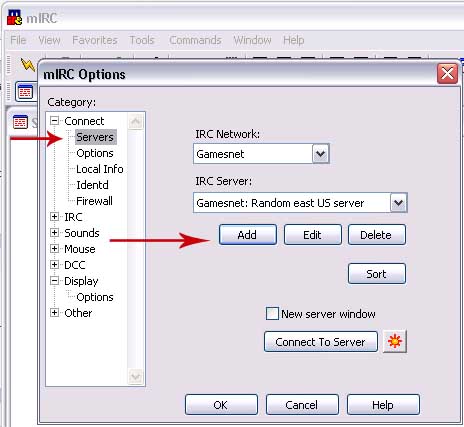
1. On the far left under connections select “Servers”
2. Click the “Add” button
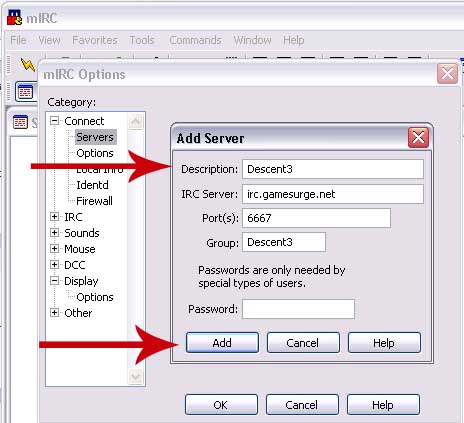
1. In the “description” field type “Descent3”
2. In the “IRC server” field type “irc.gamesurge.net”
3. Leave the Ports at the default 6667
4. In the “Group” Field type “Descent3”
5. Click the “Add” button
1.c Connecting to #Descent3
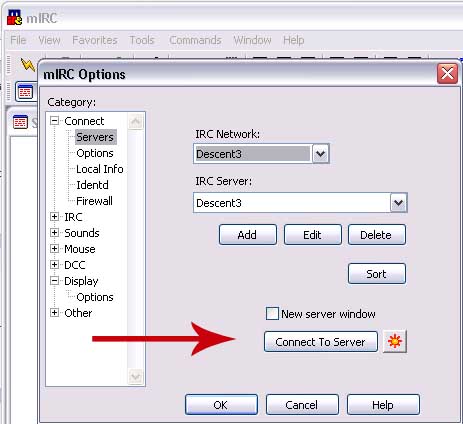
1. Select “Descent3” under “IRC Network”
2. Click the “Connect to Server” button
3. mIRC will now connect to the gamesurge network.
1.d Joining #Descent3 channel from channel window
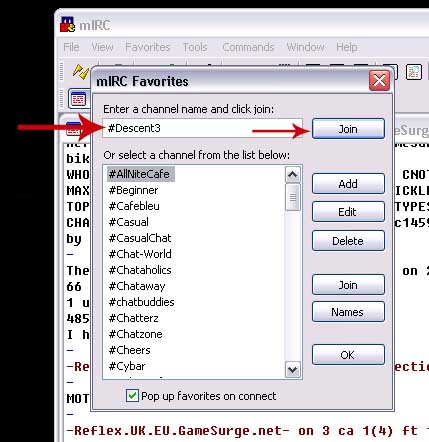
1. Upon connection to gamesurges network, mIRC will launch the channel favorites window.
2. In the text box type “#Descent3”
3. Click the “Join” button
4. Voila! You are now chatting in #Descent3
1.e Joining #Descent3 channel from server window
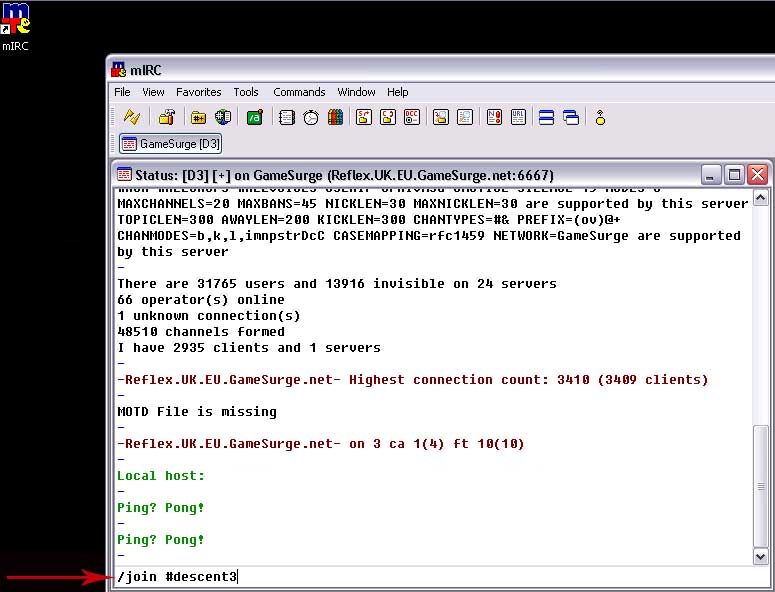
1. If you didn’t receive the favorites window, you can still manually connect to #Descent3
2. In the text box at the bottom on the server window type “/join #descent3”
3. This will also launch you into #Descent3
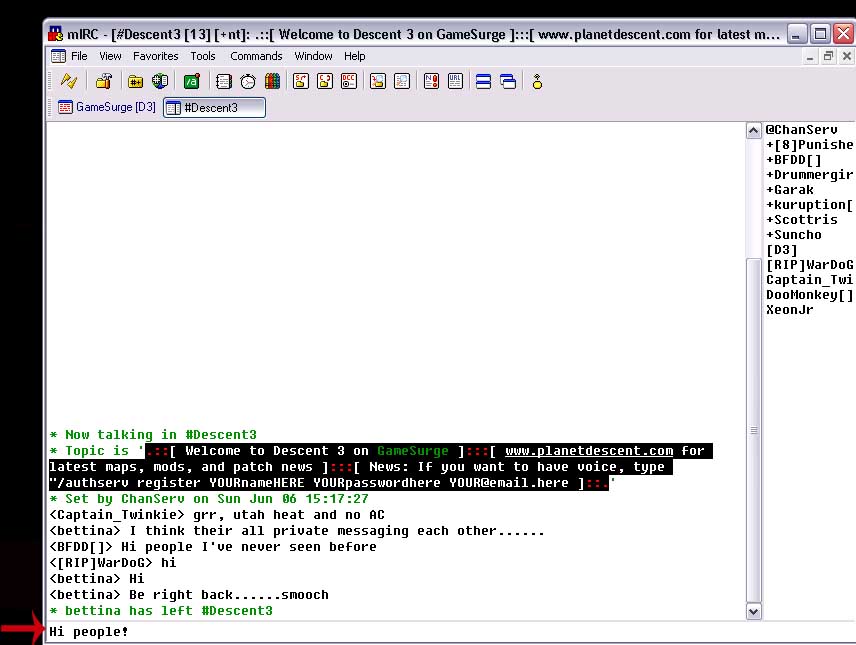
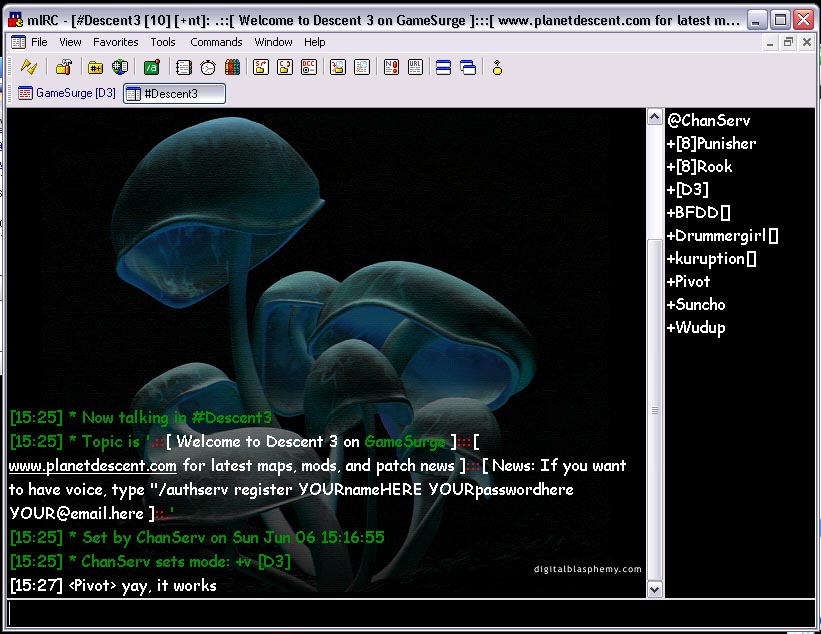
Welcome to #Descent3
2.a Options
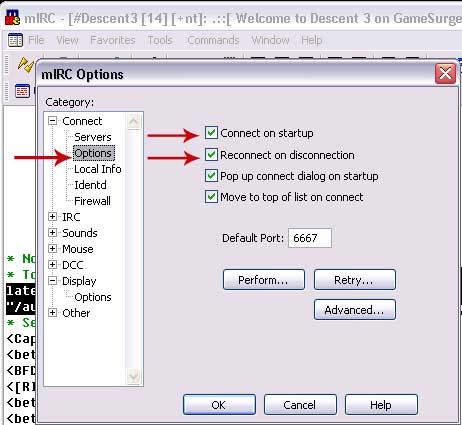
1. At the top next to “file”, you will find “view”
2. Click the options button in the drop down menu
3. Click Options under mIRC options
4. Put a check in the “Connect on Startup” box
5. Put a check in the “Reconnect on disconnect” box
2.b Perform
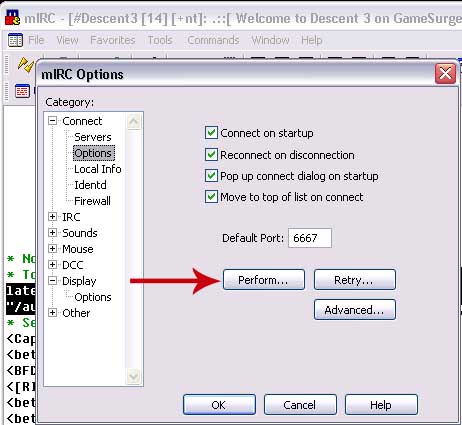
1. Click on the perform button

1. Put a check in the box next to “Enable perform on connect”
2. Make sure “All networks” is selected
3. Click the “Add” button
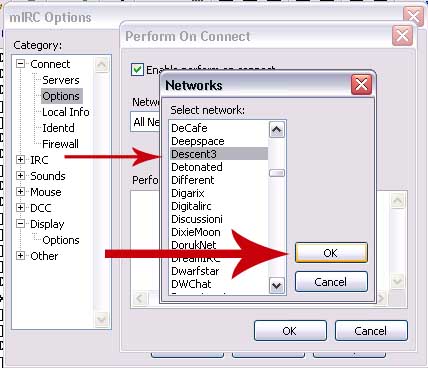
1. Select “Descent3” from the drop down menu
2. Click the “Ok” button
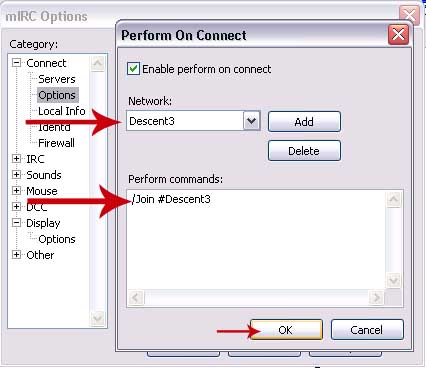
1. Under “network” select “Descent3”
2. Under “Perform commands” type “/join #descent3”
3. Click “Ok” and “Ok” again.
Now when you launch mIRC, the program will automatically launch you into #Descent3
3 Eliminating Events in chat window
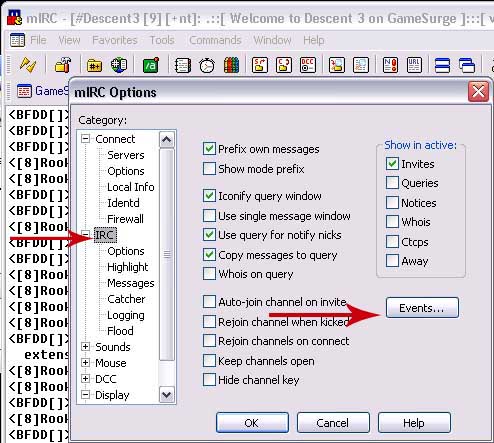
1. At the top next to “file”, you will find “view”
2. Click the options button in the drop down menu
3. Select “IRC” from the left menu
4. Click the “Events” Button
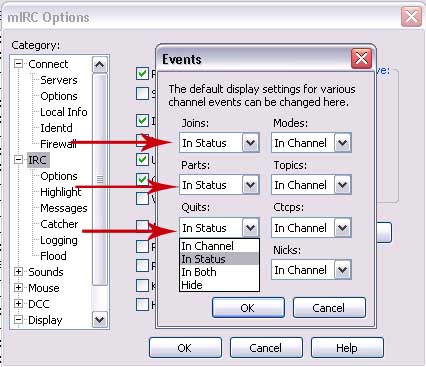
1. Change all the events you would rather not see to “In status”
2. Click “Ok” and “Ok” again
Now you will no longer see those pesky events in your chat window, and will only be displayed in your server window tucked neatly underneath.
4 Friends Highlighting
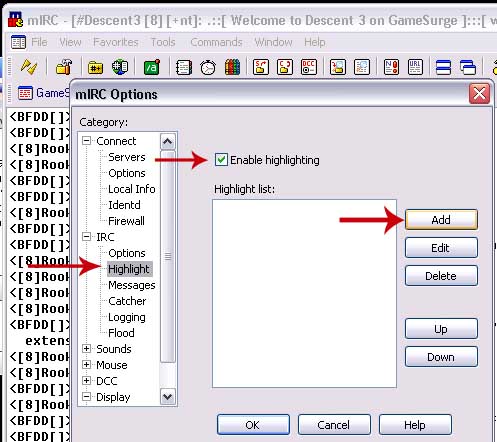
1. At the top next to “file”, you will find “view”
2. Click the options button in the drop down menu
3. Select “Highlight” from the left menu
4. Put a check in the “Enable highlighting”
5. Click the “Add” button
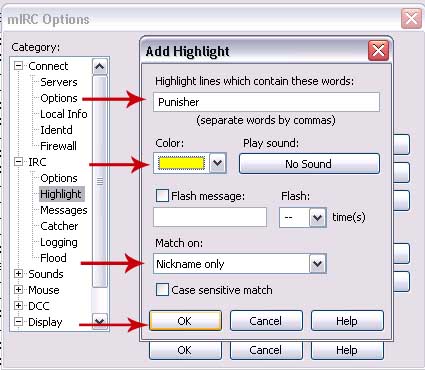
1. In the “Add Highlight” window, in the Text box type the name of the individuals alias
2. Select the color you would like that alias highlighted as
3. Under the “Match on” drop down menu make sure you select “Nickname Only”
4. Click “Ok”
Repeat for each nick you would like highlighted
5.a Colors
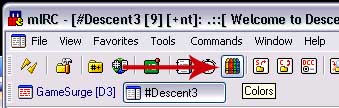
1. Select the button at the top that looks like a bunch of crayola’s

1. You can select one of the 5 pre-made color sets from the “scheme” pull down menu.
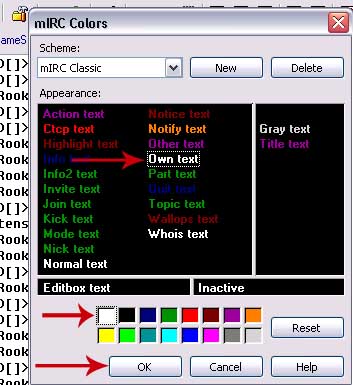
1. You can also create your own color scheme by selecting various items and then selecting the color you wish to make them. (Hint: To change the background color click on the various boxes that contain text)
2. Click “Ok”
5.b Fonts
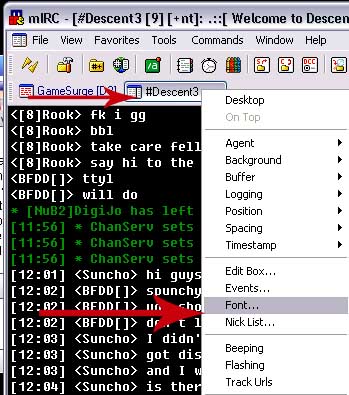
1. Right click the “#Descent3” Tab at the top
2. From the Drop down menu select “Font”
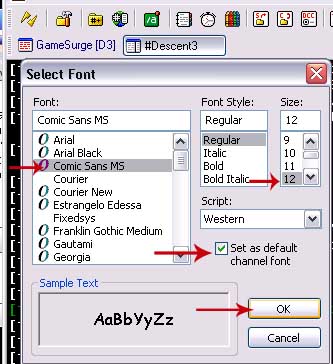
1. Select the Font you wish to use
2. Select the size
3. Put a check in “Set as Default channel font”
4. Click “Ok”
5.c Display

1. Right click the “#Descent3” Tab at the top
2. From the Drop down menu select “Background”
3. Select “Select”
4. Locate the wallpaper or image you would like to use from your hard drive
I hope this was useful to someone. Feel free to PM me in chat, or send me an email bfdd (@) d3k.org if you have any questions.